Dating App: Progress Update 1
In my last post I talked about some of the technologies that I was planning on using for building my dating app. Since then, I've completed the minimum functionality for the app and wanted to share what I've done so far.
On the backend
Skip to the next section if you just want to see some screenshots.
Behind the scenes, I've set up an Aurora (Postgres) database running on Amazon RDS. On top of that, I'm using Hasura Cloud to serve a GraphQL API. So far, I'm loving Hasura. Everything just works, I haven't run into any roadblocks yet, the documentation is great, and I've been able to fully set up my API and manage my database using their UI. The only hiccup I've run in to with Hasura was in the initial set up. They have a guide specifically on how to set up Hasura with Aurora, but the guide doesn't mention that it doesn't work with the serverless option and you need to set up your database as provisioned. I had to contact support, but they figured it out pretty quickly and I just had to create a new database.
For user authentication I'm using AWS Cognito and Amplify. This might be surprising to you if you read my review of Amplify, but it seems like it's evolved a lot since I last used it. Using Amplify also seemed like the easiest way to integrate Cognito into a React Native app. The even have specific instructions on how to use Amplfiy with an app managed with Expo, which I was using in the beginning until I had to eject (more on ejecting later). Also, you can now use Amplify just for one function, like auth, and you don't need to use Amplify for your API if you don't want to. I go into more detail about my experience using Amplify at the end of this post.
The frontend
Once I got the backend working, the next step was to build the mobile app itself which would talk to the backend. I decided to use React Native to build my app because I have a lot of experience with React and I didn't want to have to write my app twice, once in Swift for iOS and once in Java/Kotlin for Android.
I also wanted to use Expo, because I had a great experience using it with my last React Native project. It's pretty magical to have hot-reloading on an app running on my actual iPhone and not needing to use XCode or the iOS Simulator ✨
I recently needed to eject my Expo app from the managed workflow to the bare workflow, which was an educational experience. You can read about my experience ejecting at the end of this post.
The app
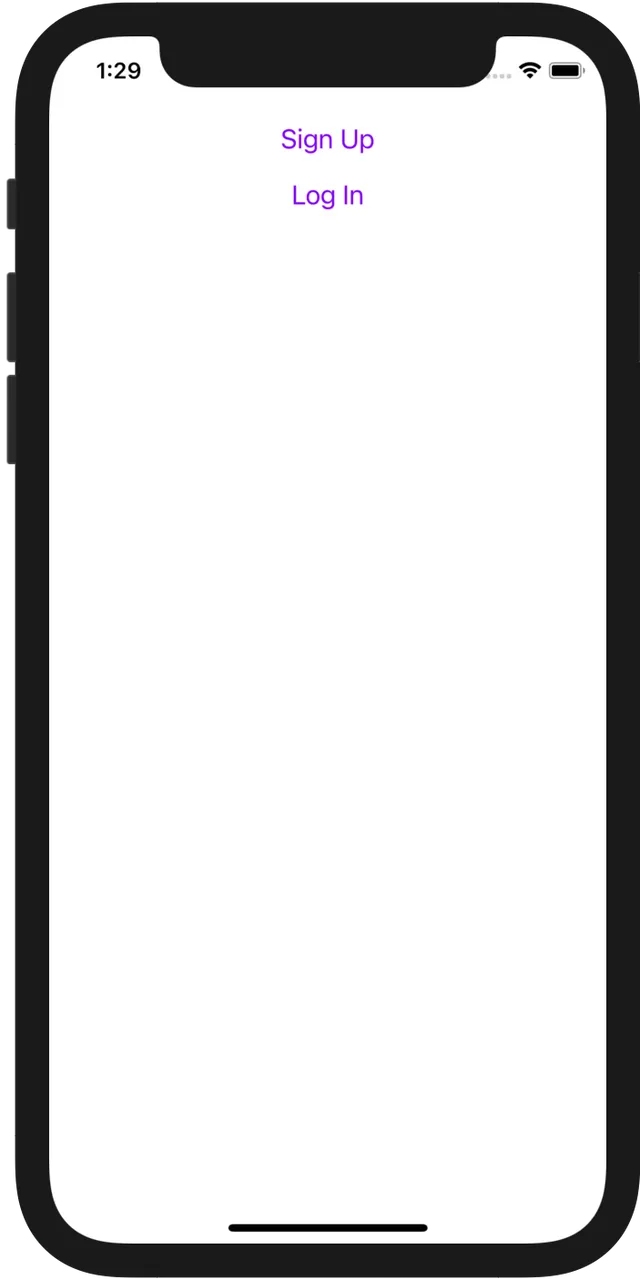 The first screen you'll see when you open the app.
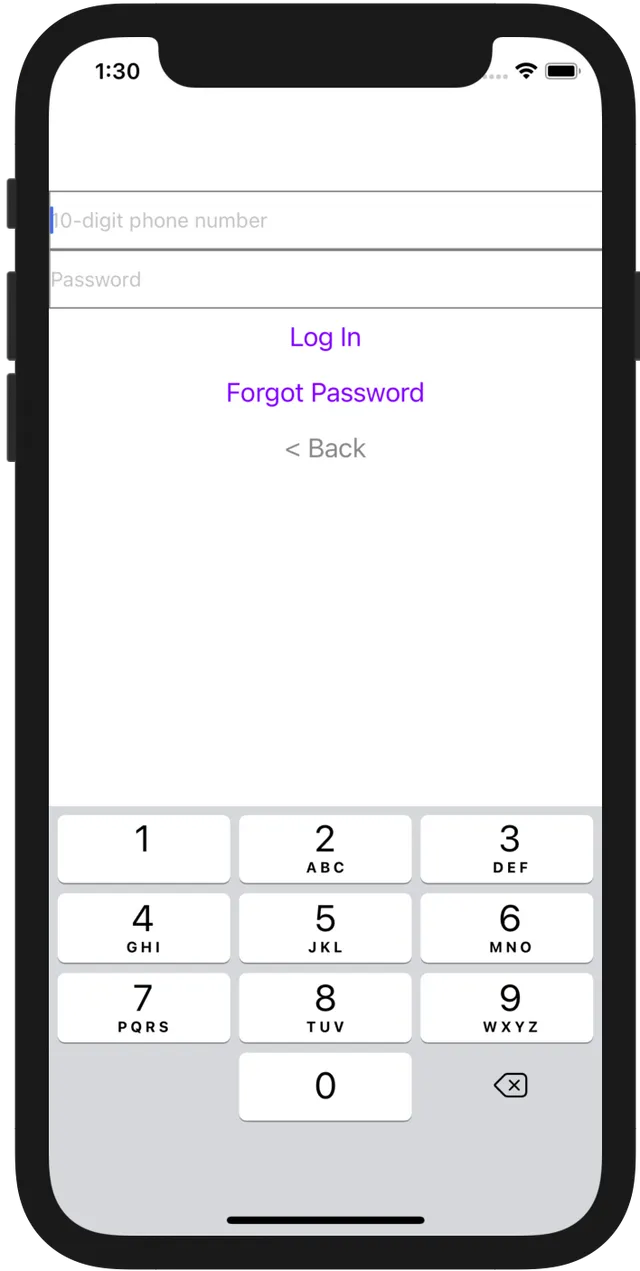 You sign in using a phone number and password. No email required.
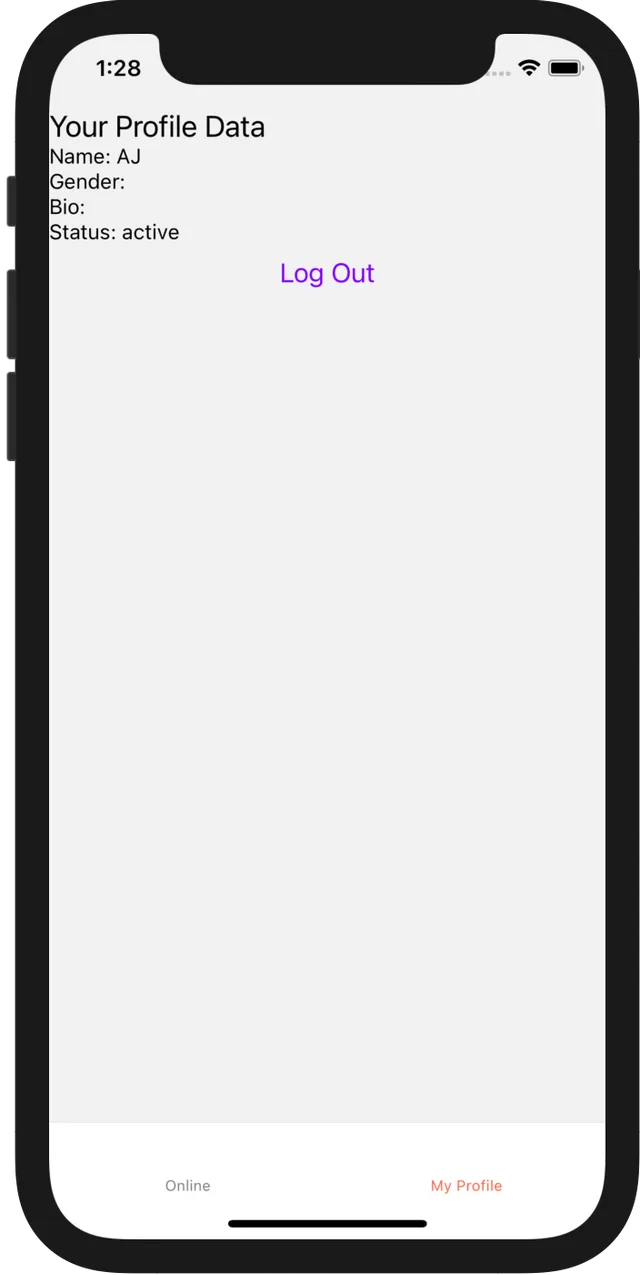 On this tab, you can see your profile information. There's no way to edit it yet.
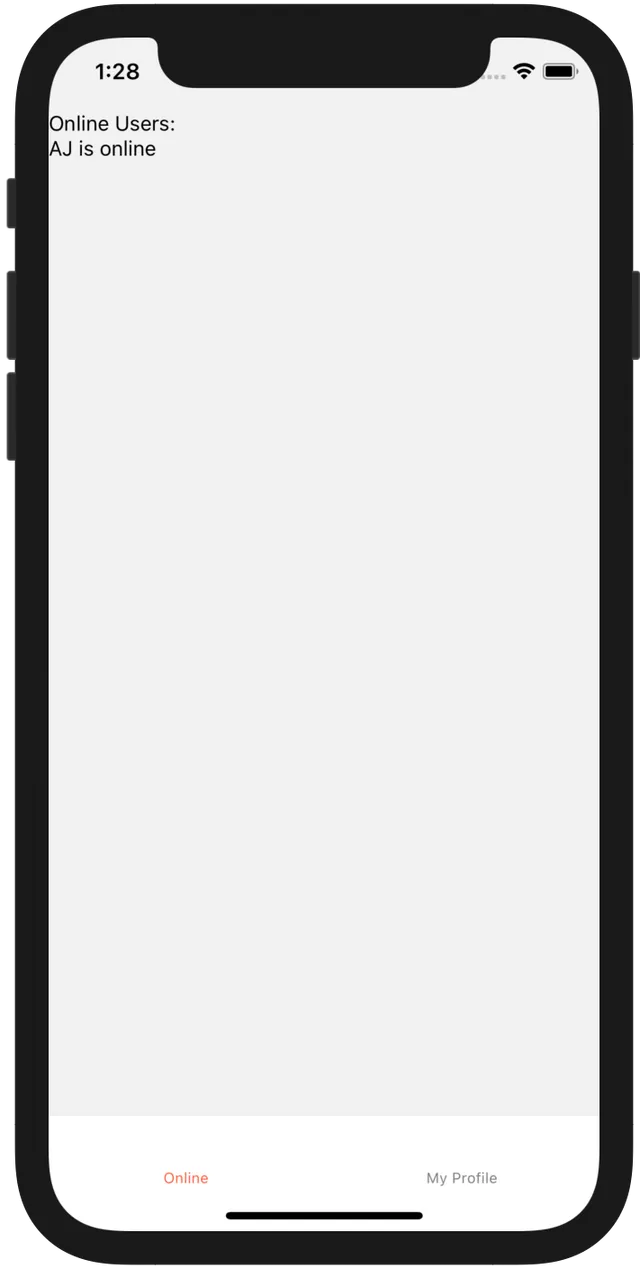 Here you can see all of the currently online users (including yourself).
This is real and dynamically updates.
Here you can see all of the currently online users (including yourself).
This is real and dynamically updates.
I have the minimum functionality working now. You'll notice that the app looks... rough. That's intentional. My strategy when working on a software engineering project is to do the hardest thing first. In this case, the part of the app I was most worried about was the live video-calling. The reason you should always do the hardest part first is because there's a chance that you might not be able to even to build it at all. Live video-calling is the central feature of my app, and if I can't figure out how to make that work and make it work well, then the whole app is dead on arrival. Imagine if I had spent months implementing every other feature of the app (photos, messaging, etc.), only to discover that I can't get the video part working and I would need to give up or make a significant pivot. All of that time and effort would've been wasted.
Once I have all of the core functionality working, I'll go back and style everything and make it look like a real app.
What you see in the screenshots above are the features that I felt were absolutely necessary to get working before tackling video. To reach that conclusion, I first imagined what the absolute minimal video-call experience could be.
The minimum video chat app I could imagine was an app that just displays a list of the currently online users and lets you call them. So, that means I would first need a way to display the list of online users and even before that I would need to set up user accounts and login. The reason you need user accounts and login is because the app has to somehow uniquely identify the person currently using the app. At one point I toyed with just asking users to provide a username every time they open the app, and then they would just "become" that user. Meaning that if you wanted to impersonate another user, you would just type in their public name when you open the app. This is obviously absurd from a security perspective, but could be acceptable for a prototype. I decided against it though because I was worried I would need to write extra code to accommodate this bizarre workflow that I'd end up throwing away later. So I decided to bite the bullet and set up the entire user authentication flow as the first step of building the app.
Setting up the authentication flow was pretty challenging because I had to set up all the inputs, transitions, and error-handling myself. Amplify actually offers a pre-built component that fully handles all of this, but I couldn't use it because it only supports email-based authentication, but I decided I wanted to use phone numbers for auth instead. Therefore I had to use the Amplify JS APIs instead.
Once I got the auth flow working, creating the two tabs with the online users and profile data was relatively easy. I'm using Apollo Client to interact with the Hasura GraphQL I set up at the beginning, so getting and showing data is straightforward.
To show the list of online users, I'm not using WebSockets or anything
fancy like that. In my users table in my database I have a column
called last_seen which is a timestamp. When you're signed in,
the app automatically sends a POST request to the GraphQL API
that updates that time with the current time. I made a custom
hook to do handle this. To use the hook, I just call
useKeepAlive() with no arguments inside of <ApolloProvider>.
Here's the code for my custom hook:
import { useEffect } from 'react';
import { useMutation, gql } from '@apollo/client';

const UPDATE_LAST_SEEN = gql`
  mutation UpdateBasicProfile($userId: uuid!, $now: timestamptz) {
    update_users(where: { id: { _eq: $userId } }, _set: { last_seen: $now }) {
      returning {
        last_seen
      }
    }
  }
`;

export default function useKeepAlive(user) {
  const now = new Date();
  const userId = user.username;
  const [keepAlive, { error, data }] = useMutation(UPDATE_LAST_SEEN, {
    variables: { userId, now }
  });

  useEffect(() => {
    const timer = setInterval(() => keepAlive(), 15000);
    return () => clearInterval(timer);
  });

  if (data) {
    console.log("I'm still alive");
  }

  if (error) {
    console.warn('Error updating last_seen:', error.message);
  }
}
Then in the Online Users tab, I query the list of all users
filtered down to people who were last seen in the last 30 seconds.
Originally I was going to set up a subscription to the users object
for automatically refreshing the user list, but Apollo recommends
avoiding subscriptions unless you really need the data to be extremely fresh,
like if you're building an instant messaging app. For my purposes, I actually
don't need the data re-fetched that often. I define a user as being online
if they were online within the past 30 seconds, so I really don't need to
re-check that information any more than every 15 seconds.
Apollo conveniently exposes a parameter pollInterval that
tells it to re-fetch the data according to whatever interval you specify.
I tested this feature by opening the app on my phone and on my computer using the iOS simulator. On my phone, I signed in using my actual phone number. On my computer, I signed in using a phone number generated by Google Voice. I had to use real phone numbers because the login flow texts you a 6-digit code to confirm you actually have access to that phone number every time you sign in.
Next up
I've now finished everything I need to support video calls. The way it will work is when you tap on one of the online users in the list, it will place a call to that user. That user will then see an incoming call within the app and they can either accept or decline the call. If they accept the call, it will open a full-screen video chat with the other user. I only have one phone to test with, so hopefully I'll be able to place a call from my phone to the iOS simulator or vice versa.
By the way, I plan on using Agora for the video calls. I evaluated several video-call vendors, and Agora was the only one that had affordable pricing, good React Native support, and good developer docs. If I'm not happy with Agora, my backup plan is to setup a WebRTC server with Amazon Kinesis Video Streams and do the WebRTC stuff by hand using react-native-webrtc.
Hopefully I'll have video calls up and running, and maybe more, when I publish my next update.
Bonus 1: Mini-review of Amplify in 2020
My updated perspective on Amplify is that it's gotten much better since 2019, but still feels like a beta product. I got stuck almost immediately because when you do the initial setup of your local environment you need to authenticate your app using a browser. I use Safari for all of my personal work, but apparently the authentication only works with Chrome and Firefox. If this was communicated in an error message, it wouldn't have been a problem but I had to dig through the Github issues to figure out why the authentication wasn't working. They also misspelled "communicate" with two "n"s in their unhelpful error message (see Github issue).
I also ran into an issue using Cognito that was significantly more challenging to resolve because I was using Amplify. When you set up auth through Amplify, it automatically generates two app clients, one with a secret key and one without. I didn't originally understand the difference between these two app clients, so I mistakenly deleted one of them. Cognito warns you that this action is irreversible, but I thought I knew what I was doing (I didn't). Once I realized my mistake, I decided that the simplest way to fix it would just be to start over. So I tried to delete the Cognito stuff through the Amplify web console, but the delete failed without any explanation. Eventually I realized the delete was failing because I first had to manually delete the domain I created in Cognito. I then manually deleted the CloudFormation stack created by Amplify, thinking I was making Amplify's job easier (I wasn't). If you're using Amplify don't try to manually delete something yourself. Always let Amplify delete its own resources. If you don't, you'll get stuck in a Catch-22 situation where it will become impossible to use your Amplify app.
After I deleted the CloudFormation stack, I noticed that Amplify was still showing that I had auth setup. Amplify must have its own state about your setup, so I figured that when I hit Delete it would just notice that the CloudFormation stack had already been deleted and it would just update its own state to reflect that auth had been removed.
Instead, when I tried to remove auth through Amplify, it complained that it couldn't find the stack to delete, so the operation failed. And if you try to add auth to the app it complains that you already have auth, so that fails too. And when I tried just deleting the whole Amplify app, that failed too because it tries to delete all of the sub-components, like the auth stuff, before deleting the top-level app. Basically, it can't delete the auth component because the auth component has already been deleted and it can't delete the app because it can't delete the auth component 🤦♂️
Eventually, I figured out that I could trick Amplify by creating a new CloudFormation stack with the exact name that it was looking for when it tried to delete the auth stack. I just made a minimal stack that created a random S3 bucket, but because the name matched the name it was expecting to exist, it happily carried out the delete operation and let me fully delete my Amplify app. I could've just abandoned my broken Amplify app and created a new one, but then I would've needed to create a new app with a new name and I know that I would constantly mix up the two apps every time I tried to use Amplify.
In conclusion, Amplify is still bad, but if you want to use Cognito or AppSync with a web or native app, you're still better off using Amplify than trying to implement everything yourself from scratch.
Also, if you're using Amplify Auth with React or React Native, I highly recommend reading this blog post by Sophia Brandt. She wrote a really good React Hook for updating your app state based on whether or not you're logged in. This is definitely something you wouldn't want to implement yourself, and should really be included in the core Amplify React library.
Bonus 2: Ejecting Expo
Expo offers two workflows: managed and bare. With the managed workflow, you can develop your app entirely with Javascript/Typescript and can mostly ignore platform-specific concerns with iOS and Android. This is the recommended workflow for most use-cases, but the drawback is that some React Native libraries either don't support it or don't document how to use it with Expo. The other limitation is that certain native APIs, like Bluetooth and WebRTC, are not supported in the managed workflow. If you start off using the managed workflow but realize later that you need to use the bare workflow (like me), then you'll need to "eject" your app to convert your app over to the bare workflow.
If you're starting a new project with Expo, I highly recommend reviewing the limitations of the managed workflow and deciding upfront which workflow you want to use, rather than ejecting later. Unfortunately, the ejection process isn't as smooth as I'd hoped and I ended up needing to spend a few days of debugging to get the app up and running again. I assume things would've worked much better if I had started off with the bare workflow rather than ejecting to it later.
That being said, most apps should be fine using the managed workflow. And if you can use the managed workflow, I highly recommend it over the bare workflow. The only reason I had to eject for this app is because I need live video calling, which means that I need to use WebRTC which is not supported in the managed workflow.
If you're wondering about the bugs I encountered when I ejected, I eventually determined
that the source of all of my bugs was something called Flipper,
which is a plugin for debugging mobile apps. I think I was having the same problem
as this person,
but they closed their own issue because it magically
disappeared on its own. Unfortunately, my issue did not resolve itself,
and none of the solutions I found online fixed it. Eventually, I was able to fix
the problem by just deleting all of the Flipper-related code from AppDelegate.m.
I guess that means I won't be able to use Flipper in my app, but at least my app builds again.
I also had to install a few extra things to get Amplify Auth working again. That was pretty
easy though because it was obvious what I needed to do from
the Amplify docs.
If you compare the instructions for Expo and React Native, you'll notice that the
React Native instructions includes an additional dependency to install,
amazon-cognito-identity-js, and an additional step of running npx pod install
afterwards. After I did that, everything in my app started working again.
However, I do still have one outstanding bug I haven't been able to fix, but I'll
probably just live with it. When I try to run my app directly on my iPhone using
the Expo server, the login step fails with the error
getRandomBase.default is not a function. I figured out that this is coming from the
react-native-get-random-values package, which is a dependency of aws-amplify.
The only solutions I could find online to this problem are uninstalling and reinstalling
aws-amplify or react-native-get-random-values or deleting my node_modules/ directory
and re-running npm install. None of that fixed the problem, of course. This
also happens to be one of those fun bugs that disappears when you run the app in debug-mode 🥲
The silver-lining is that this issue only manifests when I run the app using Expo, not when I run it with the iOS simulator, which implies to me that it's not a "real" bug and would never be encountered by a real user. There's also a pretty simple workaround: run the app in debug mode, log in, then disable debug mode. Once you're logged in, you stay logged in, so it's not like I need to do this every time I run the app. That being said, I don't think I would've hit this issue if I had started off using the bare Expo workflow, so this is yet another reason to avoid ejecting if you can.
Comments ✍️
No comments yet. Be the first!
Leave a comment