Achieving a perfect PageSpeed score with Eleventy
Update: I decided to rewrite this post as a guide instead of a story. If you want the full story of how I improved the performance of my website, keep reading. But if you just want the quick tips on how to make your Eleventy website faster, read this post instead.
Intro
As a web developer, I was feeling a little guilty about the performance of my blog. Just so we're on the same page, when I'm talking about "performance" in this post, I'm referring to how quickly the page loads.
My site was already pretty fast to begin with because of the tools I used to build my website, like a static-site generator (Eleventy), and a CDN for caching static assets (Netlify). I also don't use any client-side Javascript on my website or large CSS libraries like Bootstrap. I use Javascript, but only for building my site, and for styling I just use a single 100-line CSS file I wrote myself. Downloading large JS and CSS files (and blocking scripts) are some of the main sources of modern website slowness, which is why I chose to avoid them from the start.
But I knew there was still an opportunity to make my site faster. The one thing I felt bad about was not resizing my images to match the size I was displaying them at. Although I never display images wider than 640px on my site, I was loading images that were much bigger than that. This is wasteful because your browser downloads the full-resolution image, but then downsamples it before rendering it.
Of course, I could always manually shrink my images, but that's a pain to do for all of the images on your site, and plus, computers are smart and should be able to do that automatically. Although I've never set it up myself, I knew this was a pretty standard feature in modern tools for making websites.
Although I knew about one bottleneck making my website slow (unoptimized images), I knew there could be others. Rather than just make random optimizations to my site, I did the right thing and used a tool for analyzing the performance of my website.
Using PageSpeed Insights
From the get-go, I knew that I wanted to use a Google tool for evaluating my site's performance. That's because I wanted to test my site using the Core Web Vitals metrics that Google recently started advocating for. They clearly put a lot of thought into the selection of these metrics, and they align with my subjective experience of what makes some websites great to use and some websites terrible. My favorite metric they included is Cumulative Layout Shift, which measures how much the page "jumps" when viewed on mobile. There's nothing worse than reading an article on mobile, only for the page to scroll to a new position for no apparent reason, forcing you to scroll back to where you were.
Google actually has a bunch of different tools for measuring your site performance. You can see an overview of them here. I chose to use PageSpeed Insights because it measures all of the Core Web Vitals and is very easy to use – all you need is a URL.
For testing, I decided to use this post I wrote about Halo 3 because it has large images and an embedded YouTube video. My other posts are mostly text, so I assumed that page would have the most room for improvement.
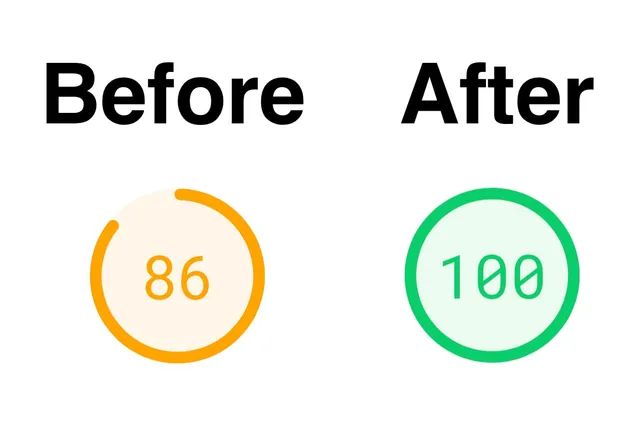
Here are my results for that page before I made any optimizations (all results are from the Mobile test):

Not bad! As I expected, just by using a static site with only a few images and no CSS or JS, my site is automatically pretty fast. For comparison, when I ran this test on the YouTube homepage, it got a score of 41. And that's a website that Google made, and they made the test!
After giving myself a pat on the back, I dug into the specific suggestions they gave. Here's what they suggested:
- Remove unused JavaScript*
- Properly size images
- Serve images in next-gen formats
- Remove unused CSS*
- Eliminate render-blocking resources
- Defer offscreen images
- Ensure text remains visible during webfont load*
- Reduce the impact of third-party code*
- Does not use passive listeners to improve scrolling performance*
But here's the kicker: five of those suggestions are solely the result of embedding that YouTube video (the issues caused by YouTube are indicated with an asterisk*). Come on, Google, that's not fair. You can't yell at me for how slow my website is when the only reason it's slow is because I'm embedding a video from the site that you made!
The other problems are legit though and fully within my control. The rest of this post shows how I addressed each of these suggestions (including the ones related to the YouTube video). Most of my performance improvements came from adding stuff to my Eleventy config, so if you just want to see the final result, you can view my Eleventy config file here.
Inlining my CSS (Eliminate render-blocking resources)
I was surprised to see my CSS listed as a culprit for making my website slow. I was pretty proud that I managed to fit all of the CSS for my entire website into a single, 100 line file. But because that CSS file gets loaded in the page head, it blocks the rest of the page from rendering until the file finishes downloading. And apparently, waiting for my CSS file to download was adding 180 ms to the overall page load time. Not much, but these things do add up. It's not that big of a deal though, because browsers cache CSS files anyway, but that only helps if the user has already visited your site before.
Anyway, even though it wasn't causing significant performance issues, it's a very easy thing to fix so I decided to just do it.
The solution Google suggests is inlining "critical" JS and CSS. When it comes to CSS, "critical" means that the CSS is necessary for styling the content that's "above the fold." And "above the fold" means the content that you see on a website right when the page loads, before you scroll down (you can read a deeper dive on critical CSS here). Based on that definition, all of my CSS is critical because most of my styles are for things at the top of the page, like the nav and page header. But that's ok, because the rule with inlining CSS is that you can only inline a small amount of CSS (whatever that means), and I figured my 100-line was probably small enough to qualify.
Luckily for me, I happened to remember that the official Eleventy docs have a quick tip on how to inline your CSS. When I first read that tip, I remember thinking that it sounded like overkill. But after seeing it come up in my PageSpeeds report, I changed my tune.
I followed the docs to the letter, so I'm not going to rehash the steps here.
The only thing that tripped me up was that I had to move my CSS file.
Originally I kept my CSS file in _pages/static/, but I had to move it to the
_includes/ directory with my template files. I don't understand why, but it is
implied by the docs so I was able to figure it out without too much trouble.
You can see exactly how I implemented this change by viewing
this commit on my GitHub repo.
Resizing and compressing images (Properly size images)
This was the most difficult change to implement, by far. I didn't feel like this was something I could skip though, because this was the original performance optimization I had planned to do. Also, the actual code change I made for this was pretty simple, but it just took a long time to figure out the exact incantation I needed to use to get the plugin to work properly.
I'm getting ahead of myself though. The first way I tried to do this was through the Netlify build settings. First I tried installing a community-made plugin that promised it would do everything I needed, but when I tried running a build with it, it didn't seem to do anything. Then I found a setting in Netlify (Site settings → Build & deploy → Post processing → Asset optimization) that promised to compress my images. I tried that, but that didn't do anything either. In retrospect I should've realized that my images were already compressed, but needed to be resized, which is technically different.
Next I did some DuckDuckGoing and found that Eleventy has a first-party plugin for resizing and compressing images. Perfect! It only took me a few minutes to copy the example code from the README into my project and then... nothing. No images displaying on the page and no magically resized image files showing up in my output folder 😞
The first error I got was AssertionError: tag myImage not found.
Searching for that error online wasn't helpful, unfortunately. But then I realized
that I was trying to use a Nunjucks shortcode inside of a Markdown file
(that's what I write my blog posts in). So I tried pasting the same code
into a Nunjucks file that I had. That fixed that error, but then I got
a new error: Input file is missing. This seems to be a pretty
common error if you look at the GitHub issues for the plugin.
Basically Eleventy is telling you that it can't find the image you're trying to use.
Unfortunately, it doesn't give you any more information than that. Although I
knew what the problem was, finding the correct combination of values for
the image source and the plugin config based on the directory structure defined by
my custom directory structure was no easy task. After an hour or more of trying every
permutation of file paths I could think of and one git reset --hard after I introduced an
infinite loop into the build pipeline, I finally figured it out.
To try and help anyone else struggling with this plugin, I'll explain what I think you're supposed to do:
- Set
urlPathto be the directory where your source images are, relative to yourinputdirectory that you configured in the return object in the Eleventy config file (the default input directory is.). - Set
outputDirto where you want the converted images to be put, relative to the root of your project (probably where your package.json and .gitignore files are). It should go into your output directory with your other compiled files (the default output directory is_site). - When you're using your newly created shortcode, the path to the file you should use
is the full path from your project root to wherever the source image is (including its file extension).
So it will look something like
./{inputDir}/{pathToImages}/{ImageWithExtension}.
After I got that working, I decided to go back and see if I could get the plugin to work with a Markdown file. If I couldn't, I would either need to find a totally new solution, or commit to writing all of my future blog posts using Nunjucks, which seemed terrible. Thankfully, I figured out how to make the plugin work with Markdown files. This wasn't in the documentation for the plugin, but I found out you can configure Eleventy to compile your Markdown files using Nunjucks, which enables the use of Nunjucks shortcodes within Markdown files. I go into the process in more detail here in the project's GitHub Issues.
You can see exactly what I did to implement image resizing here.
Using WebP for images (Serve images in next-gen formats)
I'm including this in the same section because the eleventy-img plugin can also convert your images into these "next-gen formats" like WebP. If you've never heard of WebP, it's a relatively new compression algorithm for images, comparable to JPEG or PNG, invented by Google for use on the web. Although it feels a little sneaky that Google uses its performance analyzer tool to push its own image format onto you, WebP is actually pretty cool. Basically, without any noticeable loss in image quality, it gives you at least as good compression as JPEG while supporting image transparency like PNG. It's the best of all possible worlds when it comes to image formats.
It's even supported on all modern browsers!... except Mac OS Safari 😩 This was actually really confusing to me because when you search for "Mac OS Safari WebP" one of the first results is an article from MacRumors stating that Apple would be adding support for WebP images to Safari in Safari 14. So then I checked what version of Safari I'm running right now: Version 14.0. Yay!
But when I tried switching my images over to WebP, they didn't load in Safari. Weird. Maybe I'm doing something wrong. So then I tried my site in Chrome, and the images load fine. I even tried loading a random WebP image from the web in Safari, but that didn't work either.
Now I'm thinking that MacRumors must've had it wrong about when Apple was adding WebP support. So I go to the official release notes for Safari, only to discover that, yes, support for WebP images was added in Safari 14. But I'm using Safari 14 and it's not working!
After even more DuckDuckGoing, the mystery is finally revealed. I go to the ever-useful Can I Use site's page for WebP. There it is, in Note 3: "Partial support in Safari refers to being limited to macOS 11 Big Sur and later." Come on Apple, you're better than this. Don't have different features in Safari 14 depending on which OS you're running. That's not how versions are supposed to work. Just give the versions different names, like 14.0-catalina and 14.0-bigsur or something 😞
Anyway, after all of that, I decided not to use WebP for any of my images until Mac OS Big Sur has been out for a while and most people have upgraded to it.
UPDATE (11/21/21): I'm now using WebP (and SVG) for all of the images on my website.
Defer offscreen images
This sounded hard, so I decided not to do it. Next!
Fixing all of the YouTube-induced performance issues
Using one-weird trick (i.e., Eleventy plugin) I was able to fix all of the YouTube issues at once.
Looking at the suggestions PageSpeed was making for the YouTube stuff, I realized that all of the complaints boiled down to the YouTube stuff being loaded first before the rest of the page loaded. Because I'm an Experienced Frontend Engineer 😉, I knew that the solution would be to load the YouTube video into the page asynchronously. Which is just a fancy way of saying: load the other stuff on the page first, then pop that bad-boy in there whenever it's ready.
After another quick search, I found that YouTube actually does support asynchronous loading of an embedded video. Here are the official docs on how to do that. Great, except this looks like a lot of code that I don't particularly want to write.
Thankfully, I didn't have to. On the Eleventy docs I discovered that someone had already made a plugin for embedding YouTube videos (Thanks, Graham!). It even has a convenient "lite" mode, which automatically does all that yucky async loading stuff I didn't want to figure out.
The best part of all was that after following the directions in the README, everything worked on my first try! Even "lite" mode worked without a fuss. The only weird thing I noticed was that in Safari I needed to click on the video twice to play, but my research suggested that this was an issue with Safari, not YouTube or the plugin I was using.
You can see the commit where I implemented this change here.
Results
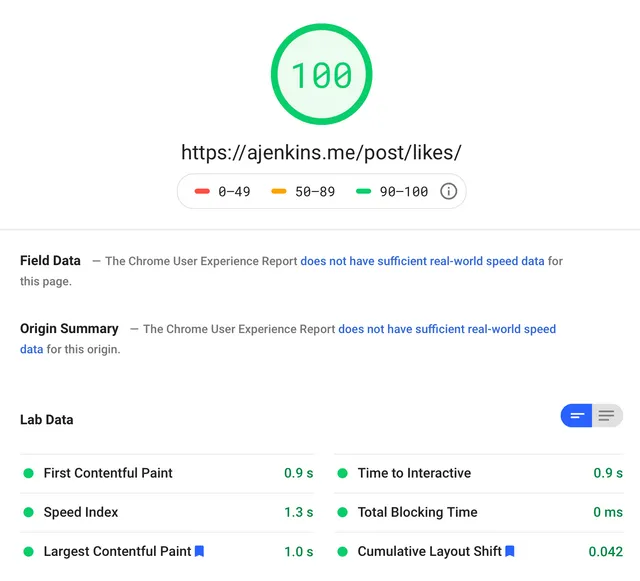
Booyah! Perfect score! Improvements in all metrics across the board, except for Cumulative Layout Shift but that's only slightly worse and it's still in the green.
Now the only suggestion I get is to use those fancy "next-gen" image formats. Which I'll do at some point, but not until Safari adds support for WebP as I discussed above.
Bonus: addPassthroughCopy
This doesn't have anything to do with performance, but it's a really useful Eleventy feature that I discovered while configuring the YouTube embed stuff, and I wish I had known about it earlier.
Here's what happened. When I was configuring the "lite" mode for YouTube embeds, I decided I wanted to be "cool" and use my own self-hosted copies of the needed JS and CSS files rather than depending on an externally controlled CDN. Hosting your own static assets (especially JS) is a security best-practice because if that external CDN ever got hacked, the hackers could replace the file you're loading with a malicious script and potentially do bad things to the users of your website. It's unlikely, but it's such an easy thing to mitigate and the exact steps were in the README, so I thought I might as well do it the safe way.
I downloaded the two files I needed, dropped them both in my trusty static/ directory and configured
the plugin to look for them there instead of the external CDN. But it didn't work. When I checked the
Network tab in the Developer Console, I noticed that the CSS file was loading fine, but the JS file wasn't
found. Which seemed weird, because I put them both in the same folder. Why would Eleventy find one file, but
not the other?
This took me a while to figure out, but I eventually realized that I didn't actually understand how Eleventy
works. For the most part, Eleventy seems to just take all of the files I feed it in the input
directory, process them, and then spit them back out in the output directory. But it
only does this for files that match the template formats you've specified in your Eleventy config.
And .js was not one of the file formats I had listed in the eleventyConfig.setTemplateFormats()
array. This also explained why a lot of other static files I had weren't getting copied over,
like my robots.txt file.
But thankfully, Eleventy provides a built-in solution to this problem. While you could
just add every single file extension to the list of template formats, that's not the best way to do it.
What you're supposed to do, is for any folder where you just want Eleventy to blindly copy over all of the
contained files regardless of file type, use the addPassthroughCopy function.
You can see how I use it in my .eleventy.js file here.
Ta da! Adding that one line fixed my YouTube problem and resolved other issues too, like some of my favicon files not being copied over correctly 🎉
Comments ✍️
By: AJ
Just testing out if the comments actually work.
Leave a comment